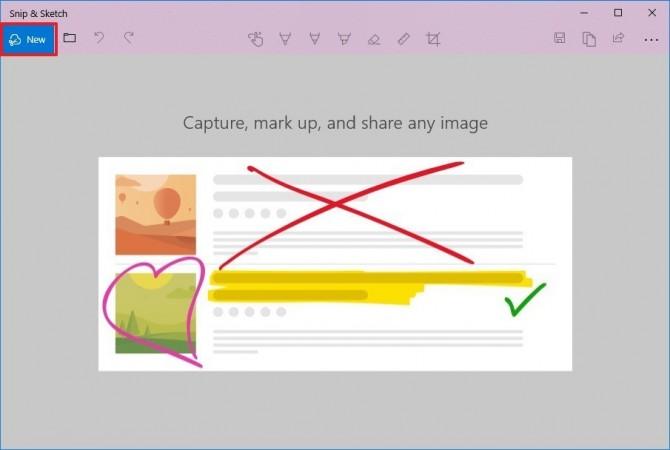
Beginning with the October 2018 Update, Windows 10 is revamping the experience to take screenshots with the new Snip and Sketch application, which is a massive upgrade to the older Snipping Tool with an added Screen sketch feature.
The outcome is easy to use and a much better experience to take and annotate screenshots of the desktop, apps, and games without the requirement of any third-party app.
So, let's see how to use the new Snip and Sketch application to take screenshots with the latest October 2018 update.
Step by step instructions to take screenshots with Snip and Sketch
Using Snip and Sketch, there are somewhere around three ways to access and take screenshots on Windows 10:
Using Snip and Sketch application

The simplest method to get to the snipping tool is to use the Snip and Sketch application with these means:
- Open Start.
- Search for Snip and Sketch, tap the top result to open the app.
- Tap the New button in the upper left corner.
- Select the kind of snip you need to use, including a rectangular, freeform, and fullscreen clip

Screenshot - Take the screenshot.
Using Action Center quick button
If you need to take a screenshot to paste on a document, you can use the new Screen snip button using these methods:
- Open Action Center. (Tip: Use the Windows key + A keyboard shortcut, or tap the Action Center button in the notification tray to open the app.)
- Tap the Expand button.
- Tap the Screen Snip button.

Screenshot - Select the kind of snip you need to use, including a rectangular, freeform, and fullscreen clip

Screenshot - Take the screenshot.
Using the Print Screen button
If you have enabled the choice, you can take screenshots on Windows 10 using the Print Screen key.
- Click on the Print Screen button. (Tip: Alternatively, you can use the Windows key + Shift + S shortcut to open the snipping toolbar.)
- Select the kind of snip you need to use, including a rectangular, freeform, and fullscreen clip.

Screenshot - Take the screenshot.
Unlike using Snip and Sketch application when using the Screen snip button or the Print Screen key, the screenshot will duplicate to the clipboard. If you need to annotate the snip or save it into a file, you have to tap the Snip and Sketch notifications in Action Center.
How to enable the Print Screen button to use Snip and Sketch
You can also get to the screen snipping tool using the Print Screen button on your keyboard, but if you want to get there manually, you can:
- Open Settings.
- Tap on Ease of Access.
- Tap on Keyboard.
- Under "Print Screen shortcut" option, turn on the Use the PrtScnbutton to open the screen snipping tool.

Screenshot
Subsequently, you can hit the Print Screen key on your keyboard to take screenshots on Windows 10.
Annotating screenshots with Snip and Sketch
Besides having the feature of rapidly taking screenshots on Windows 10, the application includes various tools to annotate pictures for all intents and purposes any way you like.
Once you've taken the screenshot, the picture will open in Snip and Sketch. While in the experience, you can use various devices to annotate the screenshot, including ballpoint pen, pencil, and marker. All of which you can snap to redo the thickness and colour.

What's more, there's an eraser to erase one or every one of the strokes from the screenshot. You can use the advanced ruler to draw straight lines, and there's an editing tool too.

These tools have been intended to work best using a stylus on a touch device, but they additionally work with a keyboard and mouse.
On the far right corner, you'll see the choices to save the snip as a PNG file. You can likewise use the duplicate button to duplicate the picture to the clipboard, which you would then be able to paste on any document.

At long last, there's the share button that helps you send the screenshot to someone else using email or through any other app.


