It is the era of instant updates and we have privileges of various social media accounts such as Instagram, Facebook, Twitter, Snapchat and much more. To create an account, all one need is an email address. This makes the creation of social media account easy but also puts the risk of creating fake accounts.
In order to make your page and account authentic, many of these social media companies have introduced the concept of the verified page with a blue tick. If you have a Facebook page for your company, brand or for yourself follow these simple steps to get the blue tick.

Why is it important to get verified on Facebook?
If the page is authentic, then more followers and readers will get engaged. Also, for celebrities, various fake accounts are made which may create various controversies for them. Sometimes, even a Facebook page can be hacked and misused, In order to avoid all these, it's better to get your page verified.
Facebook provides two kinds of verified pages.

Blue badge - Blue badge is mostly on page or profile for depicting its authenticity. It is available for the famous public figures, media company or big brand. Although, this badge is only limited to certain celebrities such as sports person, entrepreneur, big brands.

Gray badge - Grey badge depicts that the page is authentic for certain business or organisation.
Facebook also states that either of the verified badges cannot be purchased, so if you find any news stating the same, its all scam.
Eligibility of the blue verification badge is based on variable factors such as public interest, account completeness, and policy compliance. To request blue badge verification, one must accept the Facebook's terms and services and need the following things:
1. A cover photo
2. A profile photo
3. A name that follows Facebook's guidelines
4. Content posted to the account
4. "Follow" enabled (for profiles only)
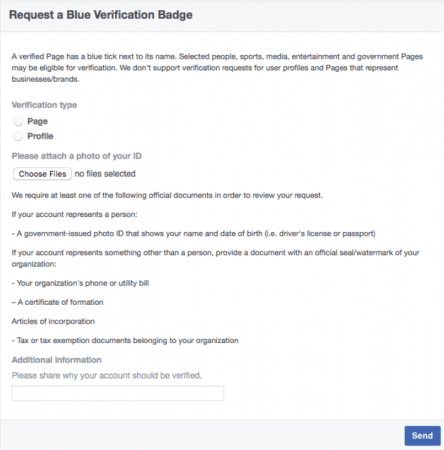
Once you have all these things done, all you have to do is fill out the form and submit it to Facebook. After filling the form, Facebook will ask you for documents such as your passport, driver's license and a national identification card to validate the badge request.
Facebook encourages to include additional information as much as it is possible to get a better perspective for your badge verification. Include sentences as to why the account should receive the badge and relevant URLs which demonstrate that it's for the public interest.
When you are done with your request, Facebook will send notification about your request submission. Facebook also states not to submit more than one request and also if badge request is denied, one can submit again after 30 days.
Contrary to popular belief which is that Facebook badge can be easily bought by some businesses parties or individuals, the organization denies it. It is an advisory to not fall for such a scam.
Gray badge verification is an easy process and can be done with just a few steps. To need the gray badge, your page should be "Local Business" or "Company" or an "Organization".
Follow the remaining steps as below to get the gray badge:
1. On the top right of your page, you will find 'Settings' link, click on it.
2. In the ' General ' section, on the left side menu, you will find ' Page verification' option, click on it.
3. Click on 'Verify this Page' and later proceed on clicking 'Get Started'.
4. Enter the 'Phone Number' for your business, your city, your country and language.
5. Later, click on 'Call Me Now' or 'Text Message' so that Facebook can send you the verification code.
6. Once you receive the 4-digit Facebook Page Verification Code into the block provided and then click on 'Continue' button.
That's all for getting verified for the gray badge.
Stay tuned. Follow us @IBTimesIN_Tech on Twitter and on Google News for the latest updates on Facebook.


!['Had denied Housefull franchise as they wanted me to wear a bikini': Tia Bajpai on turning down bold scripts [Exclusive]](https://data1.ibtimes.co.in/en/full/806605/had-denied-housefull-franchise-they-wanted-me-wear-bikini-tia-bajpai-turning-down-bold.png?w=220&h=138)


